
Showing posts with label tutorial. Show all posts
Tutorial Tuesday: Inglot Cosmetics

Hey readers! Today's post is a tutorial featuring one of my favorite brands - Inglot Cosmetics. I'm going to show you how to recreate this eye look. Since I have deep set eyes, you may have to adjust the placement to fit your eye shape.

Let's get started!

Start off with your eye and prime it. I'm using a paint pot by Mac called Painterly.

Take a shimmery orange shadow and apply it to the beginning 1/3 of the lid. I'm using Inglot #605. It's the perfect burnt orange color for this look.

For the next step, you will apply a red shadow to the majority of the lid. Be sure to overlap it with the orange to create a gradient, blended effect. I'm using Inglot #450 for this.

To bring the look together and help with blending, use a fluffy blending brush to apply a midtone to the crease. Since I don't have much of a crease, I'm going to bring my midtone up a little higher to make sure you can still see it when my eyes are open. I'm using Urban Decay Limit from the Naked 3 palette to do this.

We are going to define the crease in the next step. I began by taking a pointed crease brush and Inglot # 434. I used windshield wiper motions to blend it out. I also took Urban Decay Blackheart, from the Naked 3 palette, and deepened up the outer corner of the crease too. That step is of course optional, but I like a defined outer corner.

Your eye should be looking something like this by now.

Go ahead and create a line with your favorite gel liner. I'm using Blacktrack by Mac fluidline. You can choose to wing it out or not. I didn't do it for this look because I winged out the lower lash line with shadow instead.

At this point, it's time to highlight your inner corner. I used a mostly matte color from Wet n Wild called Brulee. This color is perfect for bringing life back into your eyes.

On the lower lash line, we are going to start with our orange shadow and blend it in the middle part of our lower lash line. I used a small pencil brush for this step. You then want to take your red shadow and bring it out in the shape outlined by the dots. It's going to act as your wing for this look.
Add your mascara and fill in your brows and you're all good to go!
I hope you enjoyed my tutorial! Let me know what kinds of looks you want to see tutorials on down below.
xoxo,
Shelly
Tag :
tutorial
Tutorial: No Makeup Makeup
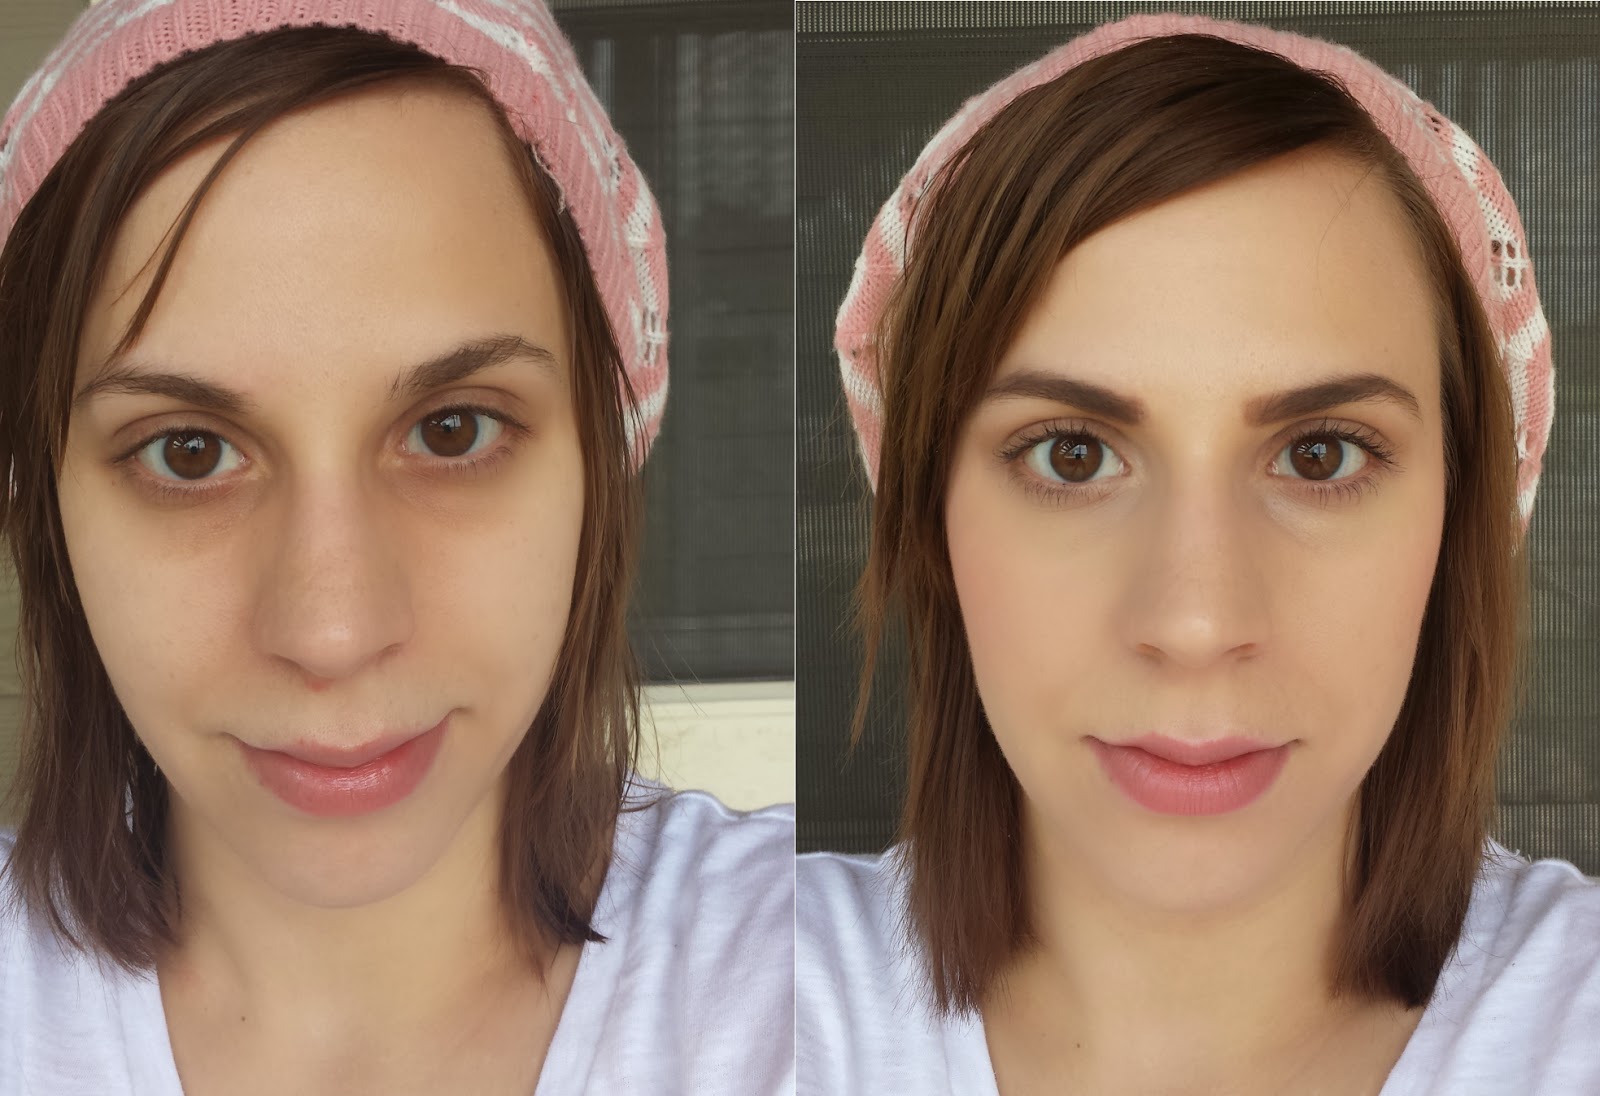
We all have those days where we look into the mirror and think to ourselves that we do not want to wear makeup for the day. Maybe we are feeling lazy or maybe we just do not want to feel like we are wearing a lot of makeup. Today's tutorial was a challenge given to me by Nichole from Pretty Girl Science. She challenged me to do a no makeup makeup tutorial using 8 products max (not including primers and setting sprays). I truly thought this was going to be impossible! Let's see how I did with the challenge and get onto the tutorial!

Step 1: Start out with your bare eye.
You can see that I have some discoloration on my eye today.

Step 2: Prime your eyes
I'm using my favorite primer, Urban Decay Primer Potion. Apply a couple of dots of primer to your eye and gently blend it out using your ring finger. The ring finger is great to use because it applies less pressure to the delicate areas of your eye.

Step 3: Matte Fleshtone Eyeshadow
For our lid color, you are going to want something that is similar to your skin tone. This will just help cancel out any remaining redness or discoloration on the eye. We do not want it to be obvious that we are wearing eyeshadow. For this step, I selected the eyeshadow on the left, which is from the Kat Von D Ladybird palette.

Step 3 cont'd: Applying the Shadow
To apply the fleshtone eyeshadow to my lids, I used a flat shader brush that is shown above. This one is by Sigma, but feel free to use whatever brush you prefer for packing on color. I used gentle patting motions to build up the intensity of the shadow and applied it all over my lid.

Step 3 end result:
The result of step three should look like the photo shown above. As you can tell, the fleshtone eyeshadow really helped cancel out the discoloration that I had on my eyelids.

Step 4: Eyebrows: Selecting a Brush
I decided to use this angled brush by Hakuhoodo. It picks up color well and allows me to create little strokes. Any angled brush will do.

Step 4 cont'd: Filling in Brows
For this step, just fill in your brows with a LIGHT hand. You want your brows to look polished, but not drawn in too much. I filled in my brows using the color on the right of the photo below.
This is a taupey brown from Kat Von D Ladybird palette. It was surprisingly a good color match for my brows. I use gentle upward strokes to fake little eyebrow hairs.

Step 5: Crease Color/Brush Selection
In order to contour the eye, I decided to use the same color that I used in my brows to gently fake a crease. Any light brown or taupe will do. I decided to use this E25 Brush from Sigma (Dupe for Mac 217). I used gentle windshield wiper motions to add just a bit of color.

I applied the color in the dotted area shown.

Step 6: Mascara
I wanted to use a mascara that was lengthening and not too overpowering. I selected Mary Kay Lash love mascara for this step. Feel free to use any mascara that you prefer.

Step 7: Foundation/BB Cream
For the skin, I decided to go with a lighter coverage than my normal look to keep the skin looking fresh and light handed. I selected my Ren Satin Perfection BB Cream in Light-Medium.

I gently applied the BB cream to my face using my fingers. Be sure to blend down the neck a little bit to make sure everything looks cohesive. When I was all done applying the BB cream, my face looked like the photo above.

Step 8: Concealer
Since I have pretty bad undereyes, I definitely wanted to conceal them with a good concealer. I am using MUFE Full Cover Concealer for this step.

I applied concealer in the areas/shapes seen in the photo above. You want to make sure that you apply your concealer in a triangular shape to cover up the under eye circles/bags the best.

Step 9: Powder
To set my concealer and BB cream, I selected my favorite setting powder: Mac Blotting Powder. Use any powder that you prefer.

Step 9 cont'd: Powder Brush/Setting Makeup
To set my makeup, I like to use this giant soft brush from Sephora with my powder. I dust my brush into the powder and gently pat the areas with concealer. Sweeping motions will take away product, which is not what we want to do. Gently pat/press the powder brush into the skin to set your makeup.

Step 10: Refreshing the face
After I apply powder, I like to take away the powdery look by spraying my face with Mac Fix+. It really helps the face look more refreshed and less cakey or heavy.

Step 10 cont'd
All refreshed!

Step 11: Lipstick
Since we are going with a No Makeup makeup look, I wanted to select a MLBB shade. I chose Flower's Petal Kiss. The color is shockingly close to my natural lip color. The matte finish helps the lipstick last longer on me.

Step 11 cont'd
Here's what the lipstick looks like on!
Here's what the lipstick looks like on!

Step 12: Blusher
To apply my blusher, I am using an angled blush brush by Sigma (the F40). For my blush, I selected a pink blusher from my Sephora trio. Gently apply the blusher to your cheeks. Make sure you do this with a light hand just to put some color into the face. We do not want the blusher to be too obvious!

All done! That concludes this tutorial. be sure to let me know what you think down below!
Tag :
tutorial
Tutorial - When You Are Sick

We've all had those days where we wake up feeling awful. Sometimes we are also not in a position to stay home from work, school, or other important commitments. I woke up yesterday looking this this and feeling like death. Knowing that I had to still go to work at my new job, I set out to figure out how to look awake and less deathly. Here's a step by step tutorial of what you can do to look less sickly.

Start out with your bare eye. You can see my eye has some redness/darkness from being sick.

Step 1: Shimmery All Over Lid Color
In order to brighten up the eye to overpower the darkness, I selected Maybelline Color Tattoo in Barely Branded.

Step 1 cont'd: Applying the color
I used my ring finger and gently blended the color all over the lid. Make sure not to tug or pull on the eye. Doing so would make your eye possibly look red and more irritated.

Step 2: Light Brown Matte Color for the Crease
For the crease, we want to select a color to contour our eye that is NOT dark. We want all of our shadow choices to brighten the eye. To do this, I have selected this light matte brown by Sleek.

Step 2 Cont'd: Selecting a Crease Brush
For the crease, I have chosen this dome shaped brush by Sigma. This brush gives me more precise control over where I place the crease color.

Step 2 Cont'd: Applying the Crease
Using the crease brush and the light matte brown shadow, we want to apply the crease color gently into the crease as shown in the above diagram. I started out with a thicker area for the crease and carefully tapered in the crease color. This helps keep the inner part of the eye the brightest and most liveliest.

Step 3: Brush for Blending
In order to blend the crease color out, you will need to select your favorite blending brush. I have chosen this blending brush by Real Techniques. The slightly pointed tip allows me to get into my deepset crease.

Step 3 cont'd: Blending!
Taking your crease brush, you want to gently use windshield wiper motions (back and forth) to blend out the shadow. Be careful not to blend the crease downwards into the light shadow. This will make the shadow look darker, which we do not want. Our sick eyes need to look as bright as we can get 'em.

Step 4: Choosing a Color to Deepen the Outer Corner
I wanted to have a deeper brown to deepen up the outer corner of the eye. I was worried that a black would attract too much darkness to the eye, so I went with brown instead. This color is by Sleek.

Step 4 cont'd: Placing/Blending the color
For this look, I chose to keep the outer corner color at the very edge. This will help keep the eye looking more open and as bright as possible. Go ahead and gently blend out the color, ensuring that the color stays in a small area.

Step 5: Tightline and Mascara
In order to keep my eyes nice and open, I am going to tightline instead of doing winged liner. I am just using this cheap black liner from NYC. It tends to stay well and has a TINY bit of sparkle to it. Gently place (push) the liner into the base of your lashes. You can wiggle the liner to ensure it gets down in there.
Go ahead and curl your lashes and add your favorite mascara. I went with a really light mascara to keep the eye open and light looking.

Step 5 cont'd
When you are all done, your eye should look something like this.

Step 6: Brow Stuff
To do my brows, I am using my favorite brow product: Anastasia Brow Kit in Dark Blonde. The kit comes with a brow gel and two brow colors. I have a previous tutorial on doing my brows if you wanna see step by step how I did them.

Step 6 cont'd Brows Complete
Ignore my sick/angry face.

Step 7: Moisturize
I cannot emphasize how important this step is when you are ill. My skin felt and looked really dry and dull from coughing and being somewhat dehydrated. I chose a heavier moisturizer by Lancome. I chose a heavier moisturizer to make my skin look more dewy and luminous.

Step 7: Apply the Moisturizer
Taking the moisturizer into your hands, gently work it into your skin. I like to start at the middle part of my face (i.e. nose, cheeks, and mouth) and work outwards. I also did little patting motions to help work the product in. Be sure to give the moisturizer several minutes to soak into the skin.

Step 8: Choose your Primer
Since I was feeling ill and blah, I wanted to use a more luxurious primer, so I reached for my Hourglass Mineral Veil. This primer makes my skin feel baby smooth. I use about 3/4 of a pump. If I push the pump all the way down, I end up with too much product.

Step 8 cont'd: Prime your face
Once I pump the primer onto the back of my hand, I scoop up the primer into my 2 fingers from each hand. I gently rub my fingers together and begin working from the middle of my face onto the out. I spend the most time working the primer into my nose since my pores are the largest there. Be sure to give the primer several minutes to soak into the skin before moving onto your foundation.

Step 9: Selecting your foundation and Tools
For my foundation, I am choosing my Mac Prolong Wear in NC15. I like this foundation because it lasts all day. This is beneficial since I was sneezing and coughing my little heart out yesterday. The foundation around my nose held up all day.

Step 9 cont'd: Applying the Foundation
I like to just put dots or strips of foundation all over my face before I start working it in. I find this helps me use less product. I pump out the Mac Prolong Wear foundation directly onto my Angled Kabuki F84 brush by Sigma. I then dab the foundation onto my face as seen above. Once I have my little spots on, I work from the middle of my face and use downward strokes near my mouth to blend the foundation in. I use downward strokes to ensure that any little baby mustache hairs will lay flat and not be emphasized by the foundation. On my cheeks, I use circular buffing motions with the F84 brush to blend the product into my skin. I also use downward strokes near my eyebrows and forehead to ensure the hairs lay flat.

Step 9 cont'd: Foundation Complete
When you are all done, your skin should look evened out but not heavy. Use the smallest amount of foundation to get the hiding the redness job done. Remember that foundation is to even out skintone, NOT to cover everything up.

Step 10: Concealer!
Concealer is really important when you have the sick under eye bags going on. Since my under eyes are emphasized from being sick, I am using a full coverage concealer. I chose my MUFE Full Cover Concealer.

Step 10 cont'd: Applying the Concealer
When applying your undereye concealer, You want to make sure you are applying it in a triangular shape as shown above. This will help to blend the darkness into your skin, rather than to settle into it and emphasize it. I also run the concealer up the side of my nose towards my brow to make sure there isn't any darkness in there.

Step 10 cont'd: Blend in the Concealer
I use my ring finger and GENTLY blend the concealer in. You DO NOT want to tug or pull at all. Make sure you are being as gentle as possible. Patting motions can be really helpful in blending the concealer in.

Step 11: Choosing a Setting Powder
To set my makeup and more specifically my concealer, I am going to select Mac's Blotting Powder. I like this powder because it is not cakey and it leaves a nice finish onto the skin. It does a good job of holding my oil at bay.

Step 11 cont'd: Selecting a powder brush
For my powder, I am using this fat powder brush by Sephora. I selected this brush because it feels really soft. Having a soft brush on your face when you feel ill is such a great feeling.

Step 11 cont'd: Setting the makeup
To set my makeup, I swirled the brush into the blotting powder and gently brushed it underneath my eyes and around my T zone. I left my cheeks bare to leave some shine in my otherwise lifeless face.

Step 12: Select a contour
For my contour, I am using Too Faced Chocolate Soleil. I like this matte contour color because it blends out very easily and smells like chocolate! It is best to use a matte color for your contour.

Step 12 cont'd: Select a contour brush
You will need to select whatever brush you prefer to use for your contour. I love this one by Sephora, so I will be using it. I like to use contour brushes that are small and somewhat flat. This really helps get right under the cheek bones to give the best shadow effect.

Step 12 cont'd: Contour that face
There are a lot of contouring videos out there that show how to contour all different parts of your face. I keep my contouring pretty basic, so I will tell you what I do.
To contour my cheeks, I am going to make this ridiculous fishy face to expose the hollow area under my cheek bones. Once I have found that hollow spot, I am going to swirl my contour brush into Too Faced Chocolate Soleil and place the brush in a diagonal line from the top of my ear. I swipe the color back and forth in the dotted area shown. It can also be helpful to blend in little tiny circular motions. I also blend somewhat upwards to help my blusher blend into my contour color. Do NOT blend downwards as it will make your face look muddy!
I also contour my forehead where the dots are shown. I follow the same swipe/blend pattern in that area.

Step 12 cont'd: Contour Complete
When you are done, your cheek contour should look something like this.

Step 13: Select a Blusher
Since my face looks dead and colorless (other than redness), I am going to select a bolder blush than normal. This will really help bring color back into the face. I am using this hot pink blusher by Sleek.

Step 13 cont'd: Select a blusher brush
Since I am dealing with a very bright and pigmented blusher, I am going to use this duo fiber brush by Sigma. This brush picks up significantly less product, which will give me more control over how much blusher is laid down.

Step 13 cont'd: Applying the blusher
There are a lot of different ways to apply blusher and different areas to apply it at on the cheek. I like to create an angular shape that mimics the shape of my contour. I find this look to be the most flattering for my face shape. I begin by using the Duo Fiber brush to pick up a small amount of the blusher. I apply the blusher in gentle, small circular motions starting in the middle of the dotted area shown. I start in the middle, so that I do not end up with a pile of unblendable pink blusher on the apples of my cheeks. I use the circular motions to blend the blusher back towards my ear and slightly forward into a rounded shape near the apples of my cheeks. Take your time blending your blusher!

Step 14: Selecting a highlighter
Since my face has lost all luminosity from my illness, I am going to select a very shimmery highlighter to bring that luminosity back. My favorite highlighter for this occasion is Soft and Gentle, a Mineralized Skin Finish by MAC.

Step 14 cont'd: Selecting a highlighter brush
I like to use this somewhat flat, domed shaped brush to apply my highlighter. I simply use the flat side (rather than the end of the brush) and rub it around on the highlighter.

Step 14 cont'd: Applying the highlighter
Once I have the highlighter onto the flat side of my brush, I am going to apply it in the dotted area shown above. To blend the highlighter, I use the tip of the brush to run it along where I placed the highlighter in a back and forth motion.

Step 15: Selecting/Applying a lipstick
Since I have been coughing and sneezing uncontrollably, I wanted to pick a lipstick that would hold up really well throughout the day and wouldn't dry my lips out anymore than they already were. For this task, I selected Twig by Mac. The color is a my lips but slightly darker color on me. This color really helps bring more color into my face, so it was the perfect choice. Take your time applying the color.

Here's the finished look. Nobody asked me at work if I was sick! I also got numerous compliments on how "pretty" I looked. Not bad for having a burning sensation in my chest/throat all day.

Here's an upclose photo of the closed eye for you to see.

As always, be sure to let me know what you think down below!
Tag :
tutorial
.jpg)


